Showing posts with label shooting technique. Show all posts

Sunday, November 27, 2011

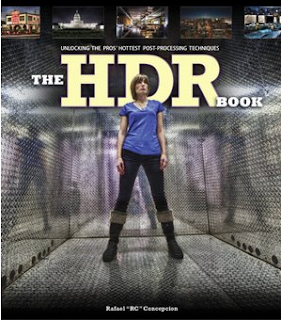
The HDR Book by Rafael “RC” Conception


Unlocking the pros’ hottest post-processing techniques – a book review

There’s no better feeling for a photographer than to have people gush over your photo, suggesting you submit it to National Geographic, or better yet, asking if they could buy it. Unfortunately, most of your shots don’t get that way with a simple press of the shutter. Most are post-processed, some heavily and more often than not, it’s the HDR images that pull the most praise.

So how hard is it to learn HDR? Can a hobbyist learn HDR, or does it take years to perfect? The answer is Yes and No.  Learning HDR, whether you use Photoshop, Photomatix or Nik’s HDR Efex Pro, could take years; but, with RC’s newest title The HDR Book, you’ll be producing fantastic shots in under a week.

What makes people crazy is that the first time you use Photomatix, after you press the “create” button, you wait for your masterpiece to appear. When it finally does, it usually looks plain awful.  That’s because the image created is really not finished. You next need to “tone-map” the image. That’s where the magic begins to happen. 

Only problem here is that there are so many choices in the tone-mapping process that most mere mortals get overwhelmed with all the check boxes and sliders at their disposal. It can be quite intimidating.

Enter The HDR Book.  Just as the Canadian Mounties save the day up north, RC saves the photographic day for his readers.  In a non-techie tone, he explains what you need to do to make the choices that will both start and finish your photos into the masterpiece that you hoped for. 

Luckily for you, he doesn’t confine his suggestions to one specific brand of HDR software. He actually shows you how to create your art using each of the three primary software choices. He also spends an appropriate amount of time discussing the setup of your shot, what type scenes are the best candidates for HDR and shortcuts that will save you processing time. He even discusses how to do single-shot HDR’s and using HDR for black and white photos. 

Step by step, in ten different photos, he shows how each situation can be handled using each of the three software packages. But then, the secret sauce is revealed when he takes each image back into Photoshop for the final tweaks that make that photo really pop. 

As a bonus, Kelby Training did an hour- long webcast about the book that anyone can view for free. View that first or just head straight for your local book store and get started with the real thing. Your pictures will love you for it.
Wednesday, September 21, 2011

Photoshop Compositing Secrets – by Matt Kloskowski


It's like having a Photoshop composite guru sitting right next to you

I knew I was going to love this book the moment I opened it. There was no Chapter One…turn on your computer, Chapter Two…make sure you have administrator rights, blah, blah, blah. NO. Instead, Matt starts with “10 Things You Need To Know About Compositing.” Wham. You get the good stuff right up front. Priceless. 

Instead of waiting until you’ve read the whole book, you are exposed to the key points to keep in mind while you are shooting your subject as well as while you are selecting an appropriate background photo. 

So, when you actually start Chapter One, some 25 pages later, each time a key point is mentioned, you’ll have a mini “ah-ha” moment when you can pat yourself on the back and say “I knew that.”  While I’m not a trained educator, I can’t help but think that will really enhance your retention of the concepts and be very valuable to the learning experience. 

Since compositing requires at least one photo to be cut out and dropped into another photo, Matt uses a good amount of pages showing some great tricks that really simplify the process. With his recommendations, you’re going to become a big fan of CS5’s improved Refine Edge and Edge Detection features.

Matt stresses the importance of keeping the same relationship between your shooting position of the subject and the background. For example, if you were kneeling on the ground, shooting up at a football player, that photo would look really strange if you tried compositing it with a photo of a football stadium taken from the top row. Your camera position should be in the same place for both. Matt shows you his preferred method – it’s really quite simple.

The book is really chock full of great practical advice. Here are just a few that stood out to me:

Chap. 5 deals with shooting multiple people individually and making them look natural when composited together later. 

Chap. 7 has just the right setting for grabbing those small details of a city skyline.

Chap. 8 shows a great composite of a concert scene that would be extremely difficult to pull off in the field. It also reinforces my thought that you ought to shoot stock shots of every concert venue you go to before the action starts, so you have good background stock images to use later. 

Chap. 10 may be a favorite as you learn how to create the typical movie poster. So who wouldn’t want to see themselves as the hero on a movie poster?

Chap. 12 shows how to make those sports template backgrounds that are so popular. You’ll be amazed how easy it is to create stuff you used to buy for $10 or more each. 

Chap. 13 lets you take that one killer photo and use it multiple times to make a single-photo composite. Hey, if it’s that good, why only use it once?

So, like if this book didn’t have enough good stuff already, there’s even an online tutorial where Matt and Scott Kelby show some of the highlights of the book as well as discuss plugins, tablets and other things that help with the compositing workflow. 

If you even have one compositing project to do this year, you won’t want to miss this book. It’s really that good.

Tuesday, September 20, 2011

Easy video shooting with your DSLR


Now, an accessory that really makes DSLR's video ready.

Of the millions of DSLR (Digital Single Lens Reflex) (most cameras with interchangeable lenses) cameras that exist around the world, a good percentage of them are capable of shooting video. Whether shooting 720p or 1080i, these DSLR's are capable of shooting extremely high quality footage. Entire films actually have been shot using nothing other than a DSLR or HDSLR.

The problem with shooting video on these cameras has always been the viewer. While looking through the conventional eye-piece works well for shooting stills, you are unable to use the eye-viewer when shooting video. The photographer must use the LCD panel on the back of the camera and that's where the problems start. Most people can't focus on the LCD panel unless held at some distance from their eyes, and that distance is unusually uncomfortable to steadily hold the camera for more than a few seconds.

A company in Estonia called Kinotehnik saw this problem and created an extremely elegant solution. A magnetic rim is provided that sticks around the perimeter of the LCD screen. (In fact, they supply two.) Then, the approximately 3 inch long viewfinder magnetically snaps onto the rim. With the patented optics included in the LCDVF, you can place your eye up tight to the viewfinder and see your LCD screen perfectly. They claim the view you get is equivalent to watching a 42" screen from 4.6 feet away. That's big, bright viewing folks. There is no diopter correction built into the LCDVF.

Once the LCDVF viewfinder is in place, and you have put the viewfinder up tight to your eye, your elbows and arms can be braced in normal fashion, and you can shoot with relative steadiness for long periods of time. Without the viewfinder, I would always start to notice shake in under 10 seconds. The accessory can still be used even if you are using a tripod, which is obviously your best choice for long shots. The viewfinder can be flipped 180 degrees for left or right eye viewing.

Besides steadiness, light glare was always an issue when shooting outside. The LCDVF eliminates all that as well. The solution is so elegant, but it took Kinotehnik to make it practical. Before LCDVF, I used a competitor's solution that looked similar but was anything but practical to attach to the camera. They required stretching elastic bands crisscross around the camera and that took forever. With LCDVF's magnetic base, the viewfinder is on and off in a second.

The LCDVF has a lanyard attached, so you can let it hang from your neck between shots. When you are done using the LCDVF, it stores in a handy pouch, complete with a clip to faster it to your camera bag.

The LCDVF comes in multiple models depending on your camera's LCD measurement.  See this list to determine if your camera is compatible.

To purchase a unit, you'll find a list of resellers on their website

Monday, February 8, 2010

Strongsville toboggan chutes are great family fun this winter


Hurtling down a 1,000 foot long ice covered chute….wind tearing off your knit ski cap…. trees flying by at 50+ mph. This could only be a good thing if you are in Strongsville, OH at the Chalet toboggan chutes. Come to ride or come to take pictures, you’ll have fun either way. (Click here for the full slide show of my images from this shoot.)

Pulling into the parking lot, off Valley Parkway between Rts. 82 and 42, you’ll find plenty of parking. Walk around to the right of the Chalet and you’ll find the ticket window. Purchase your ticket, walk through the portal, grab a 40# toboggan and start climbing stairs. 124 steps wind you back and forth, up the hill, until you reach the top.

At the top, climb aboard your toboggan and you’re off on your 15 seconds of windblown adventure. Dual chutes are available in case you’ve got friends who want to race you to the finish. At the end of the ride, hop off, walk back and do it again. Thankfully, the kind Metropark’s people take care of transporting all the toboggans back to the base of the hill for you.

Photo opportunities abound. You can shoot from outside, braving the elements, or shoot through the big glass windows of the chalet. Crank up that shutter speed to 1/250th of a second or better and pan your camera as the sleds fly by. Slowing the shutter speed to 1/60th or so, and panning carefully, will render a shot with great motion blur for a background. (See the slideshow below for examples.) You can shoot at the base of the hill for that dramatic vertical drop look, or move further down the tracks to get the toboggans racing for the finish line.

For 42 years, the Cleveland Metroparks have been providing excitement for winter thrill seekers. From the day after Thanksgiving, through the first weekend in March, weather permitting, the chutes are open Thursday through Sunday. You can call 440-572-9990 to make sure.

According to Melissa Tirpak-Chylik, Chalet Manager, groups come from all over, including one group from Arizona, to enjoy the tobogganing. If you have a group, you can arrange for private hours and days of operation. Check the Cleveland Metroparks Web page for more information.

Hours are as follows:
Thursday 6:00 p.m. – 10:00 p.m.
Friday 6:00 – 10:30 p.m.
Saturday Noon – 10:30 p.m.
Sunday Noon – 5:00 p.m.

You must be 42” or taller to ride and being in good health is strongly advised. Back problems, scared of heights, heart trouble? All those might be good reasons you’d prefer to watch only. But there’s a place for that too.

Inside the Chalet, where a big wood fire keeps things cozy, you can watch from the second floor and get great views as your friends speed by on the chutes. There’s a snack bar as well and they keep the hot chocolate flowing.

Tuesday, May 12, 2009

It's National Photography Month

Every year, the Photo Marketing Association celebrates May as National Photo Month. It's a time to start taking photos and to start doing something with all those digital files you've got sitting around.

To help the effort, PMA has put together some guides that cover a variety of topics. Today's guide covers camera selections, how to improve your shooting angle, how many pixels does it take to print an 8x10, and much more.

Click here to download your free guide. It's a 5.7 MB download. Enjoy.

Come back later this month for a guide to cell phone photgraphy.

Thursday, April 30, 2009

Get down

COLORADO SPRINGS, CO. -- I'm here in Colorado Springs on a commercial assignment. Yesterday I had the chance to visit the US Air Force Cadet Chapel again. I was looking for a different way to shoot a subject I've shot many times before. Remembering a time-tested formula, I just dropped to the floor and shot from an ant's perspective.


All my other past images were from standard eye height. Literally putting my camera on the floor gave me a couple advantages.


First, having it rest right on the floor eliminated the need for a tripod. I was able to brace the body on the floor. I clenched a fist and held the lense tight against it to elevate the front of the camera just slightly.


Having a steady platform is essential for getting sharp images in low light situations and believe me, this was low light.


Secondly, I gained a great reflective image in the foreground by being so close to the floor. I obviously lost some height by aiming lower, but I consider this a worthwhile tradeoff.


In most any situation, you'll be surprised by the interesting new perspective of shooting from ground level. Give it a try.
Related Posts Plugin for WordPress, Blogger...

College Specials